

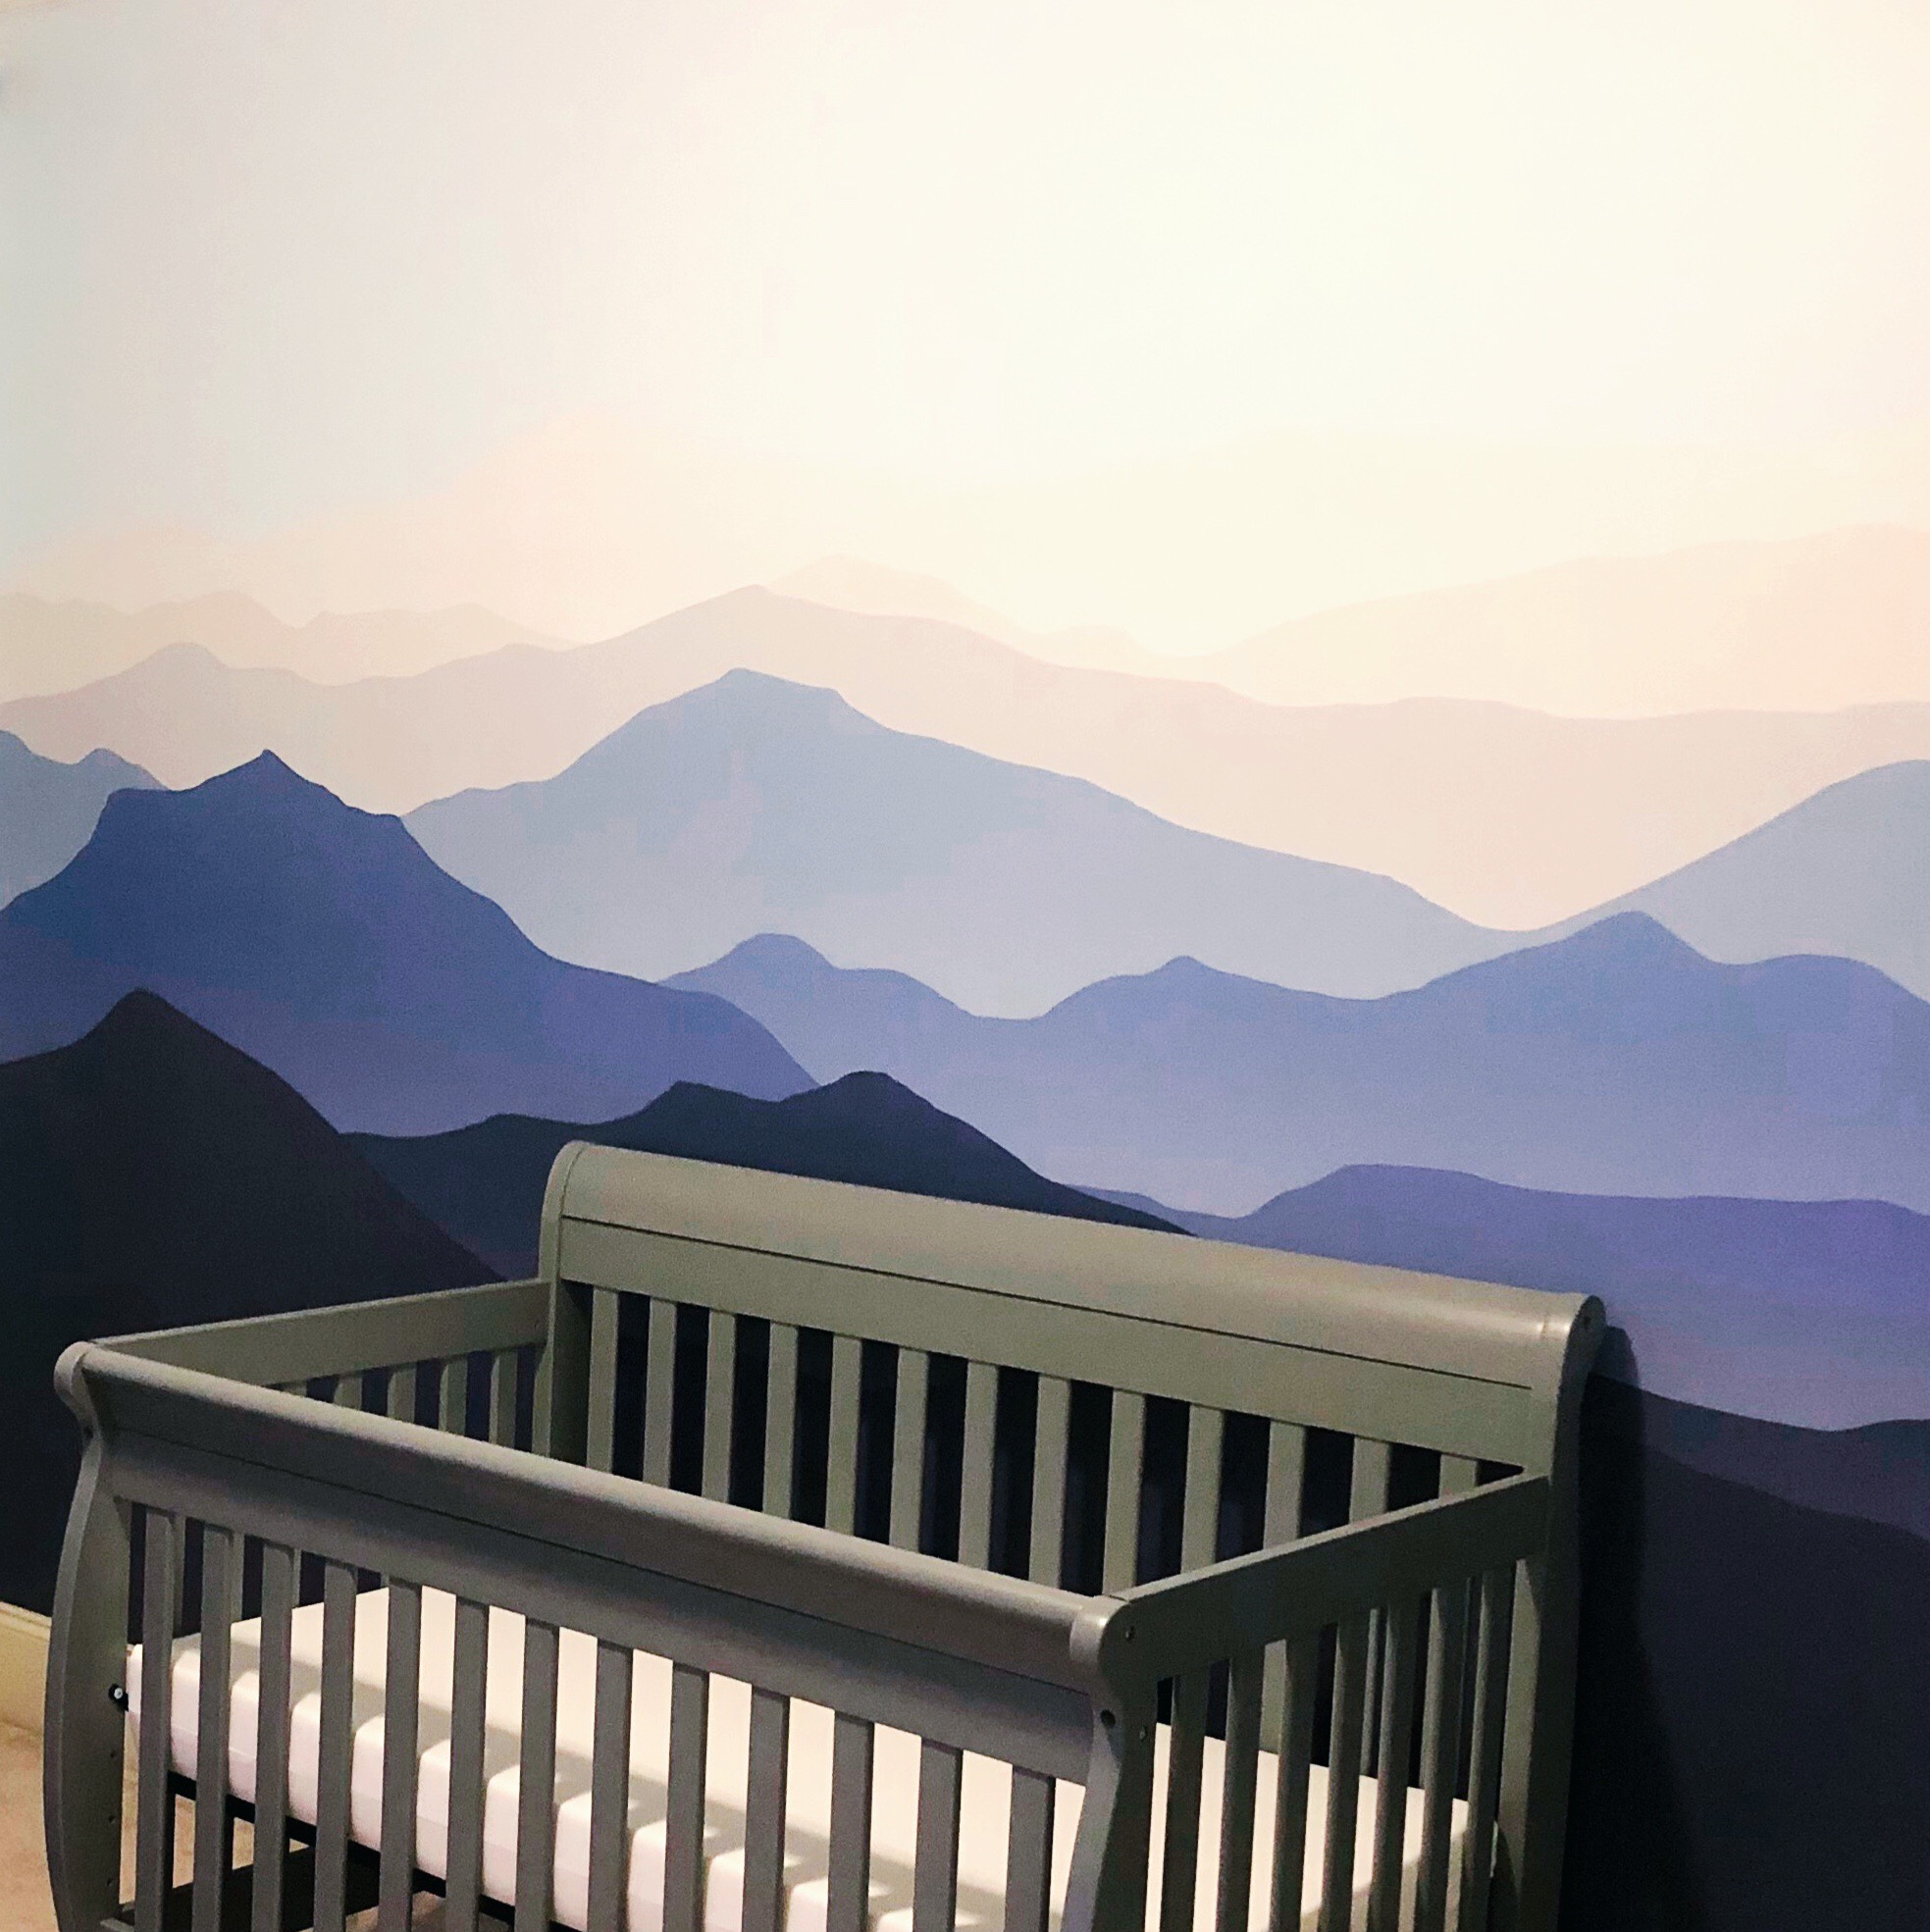
I got a text from one of my good friends showing me the beautiful mountain mural she’d put up in the nursery for the baby boy she’s expecting in a couple months. She lives far from me and I knew I wanted to send her a baby care package that included a crochet blanket using the colors in the mural. After browsing through some baby blanket patterns on Pinterest I had an idea- what if I not only incorporated the colors of the mural into the blanket, but the design as well? And so, the Move Mountains baby blanket was born!
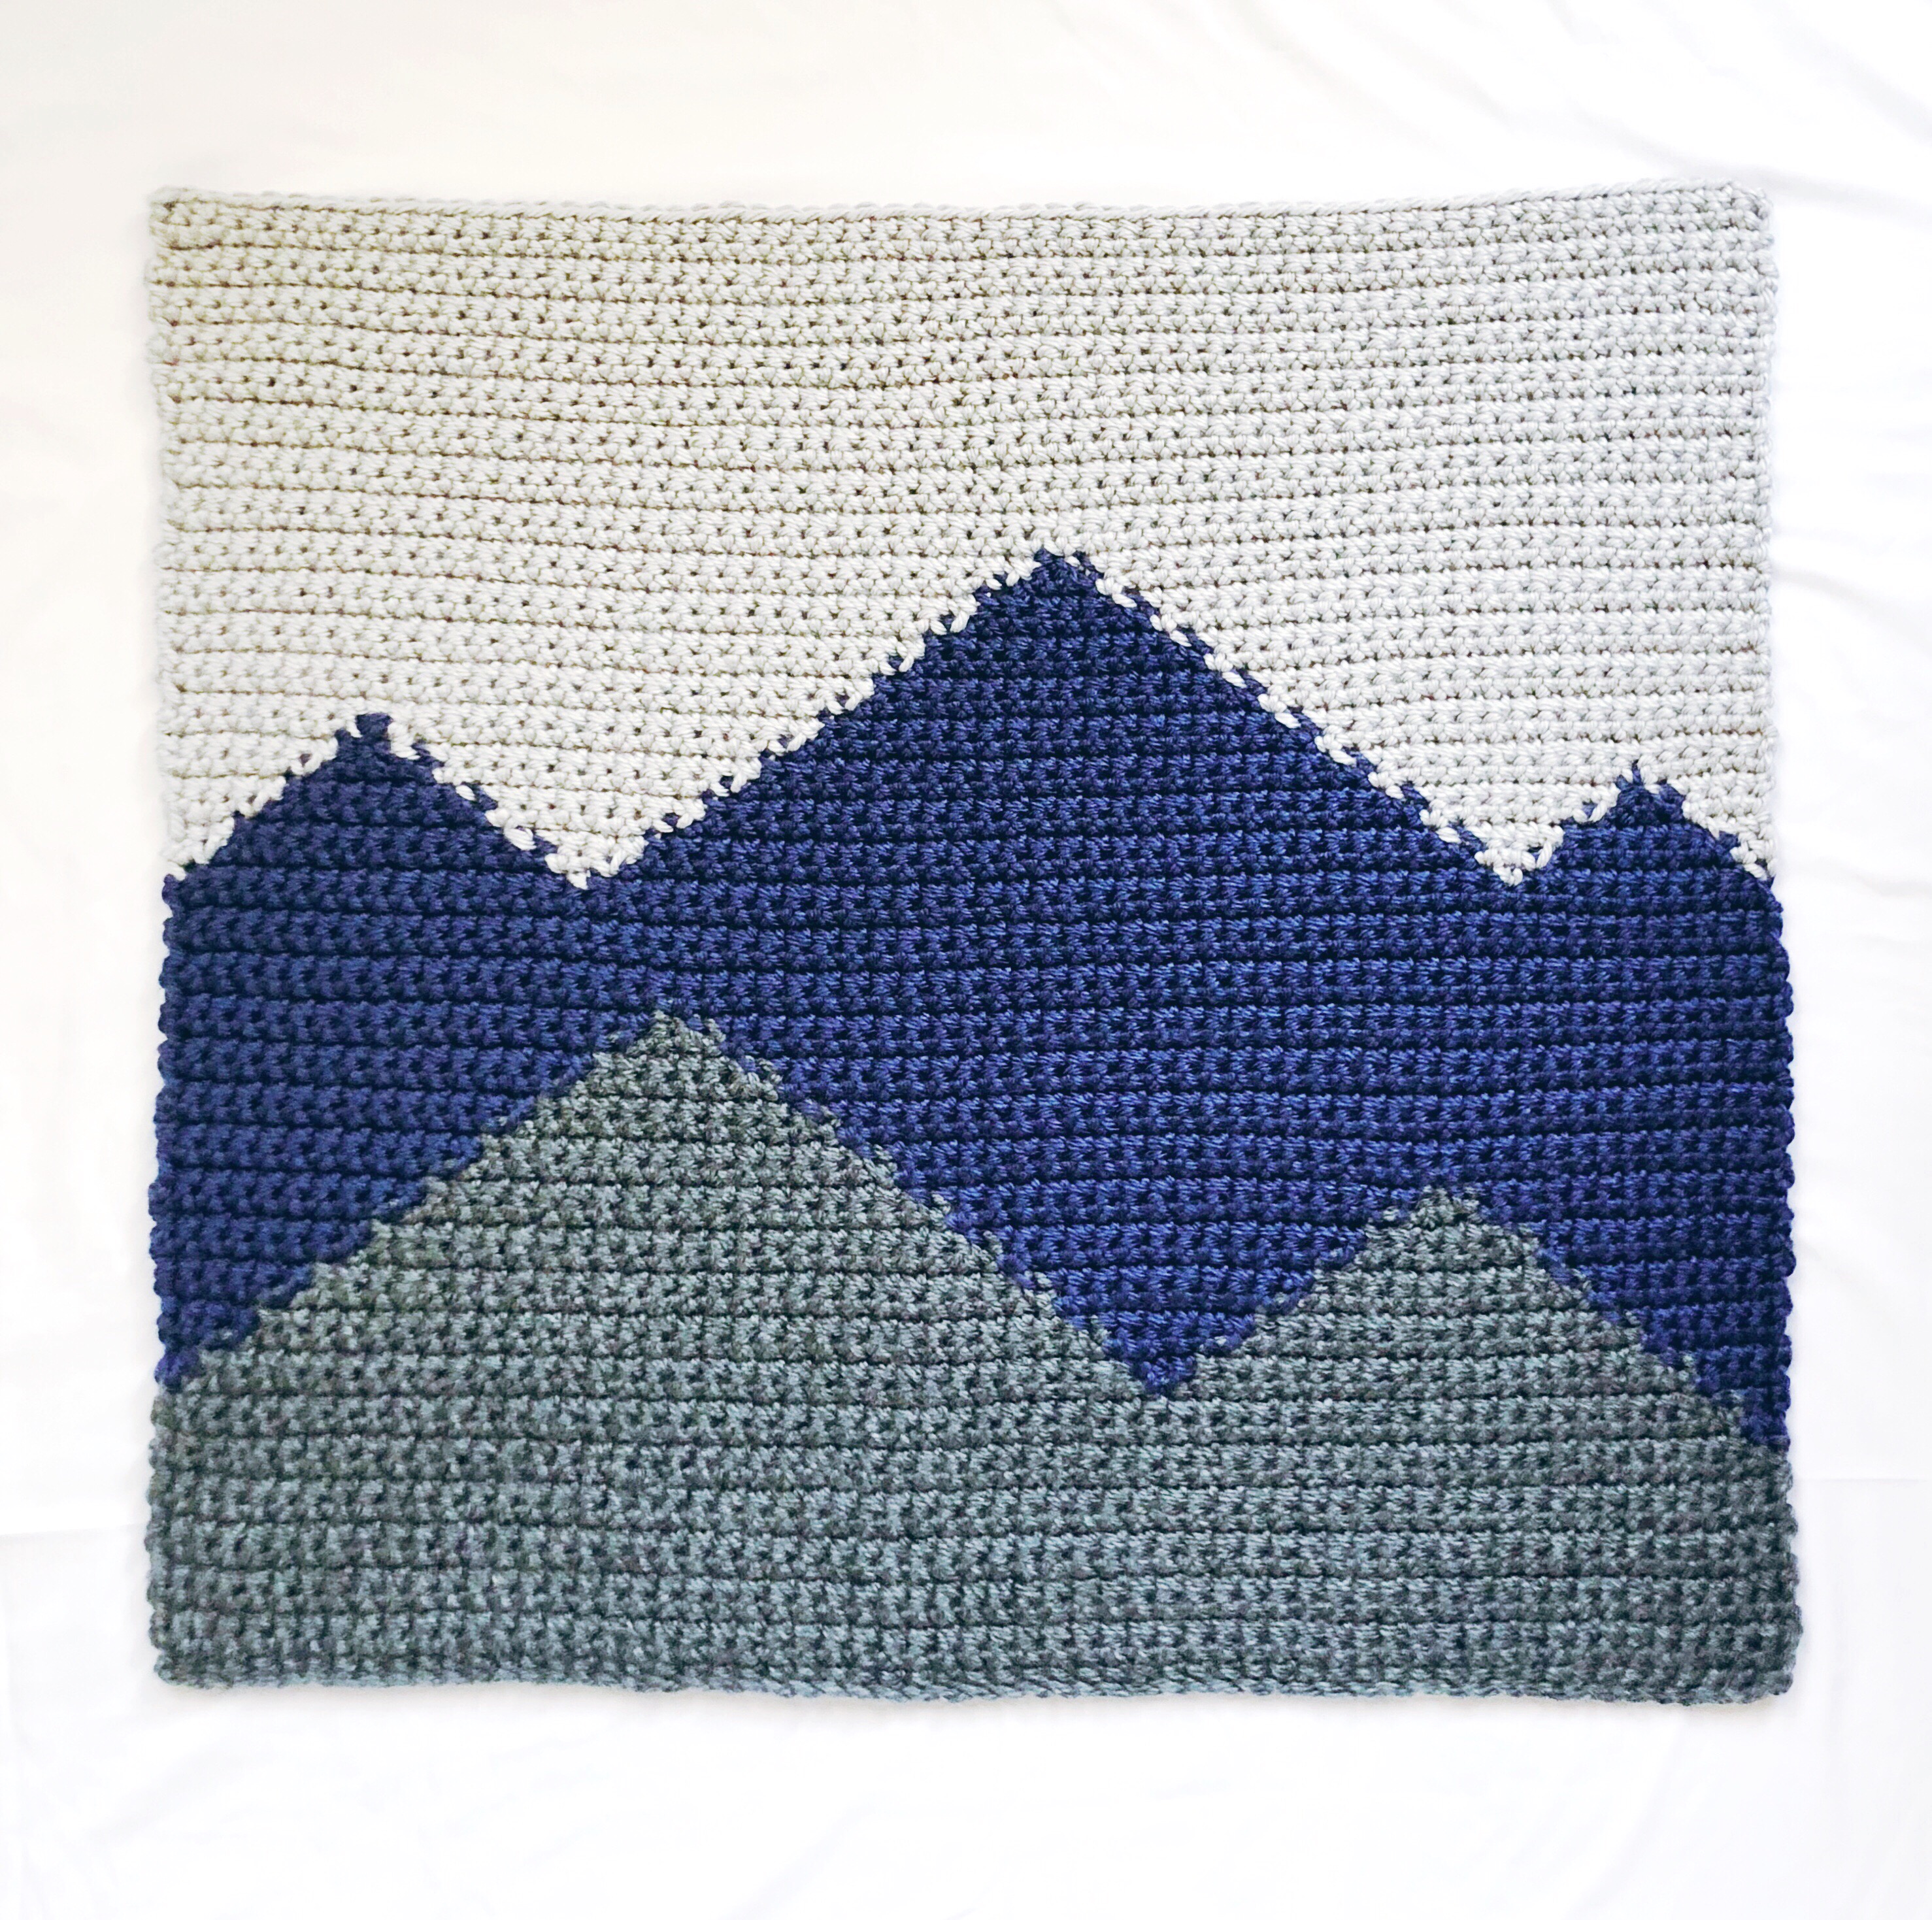
I had never made a blanket like this before and knew I’d need a visual to keep track of when I should be adding my colors. I used the website Stitch Fiddle to design a template for my blanket, and after a lot of trial and error this was what I came up with:
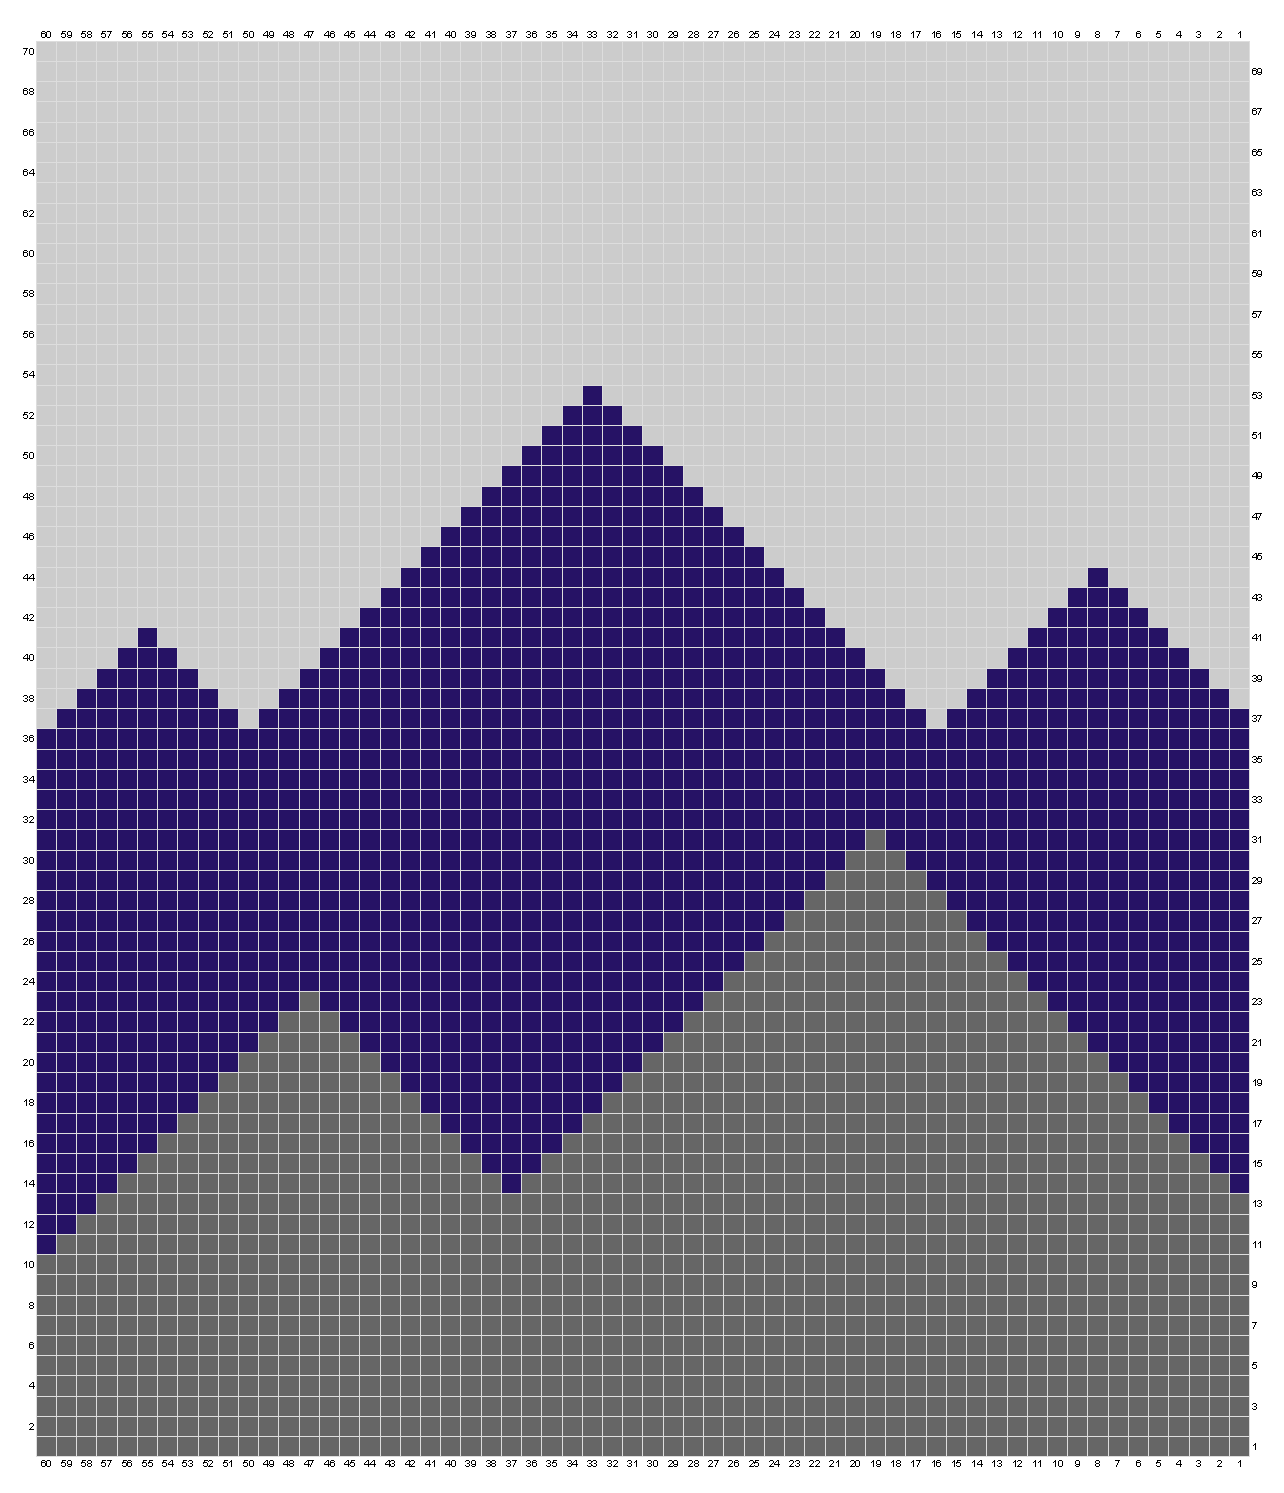
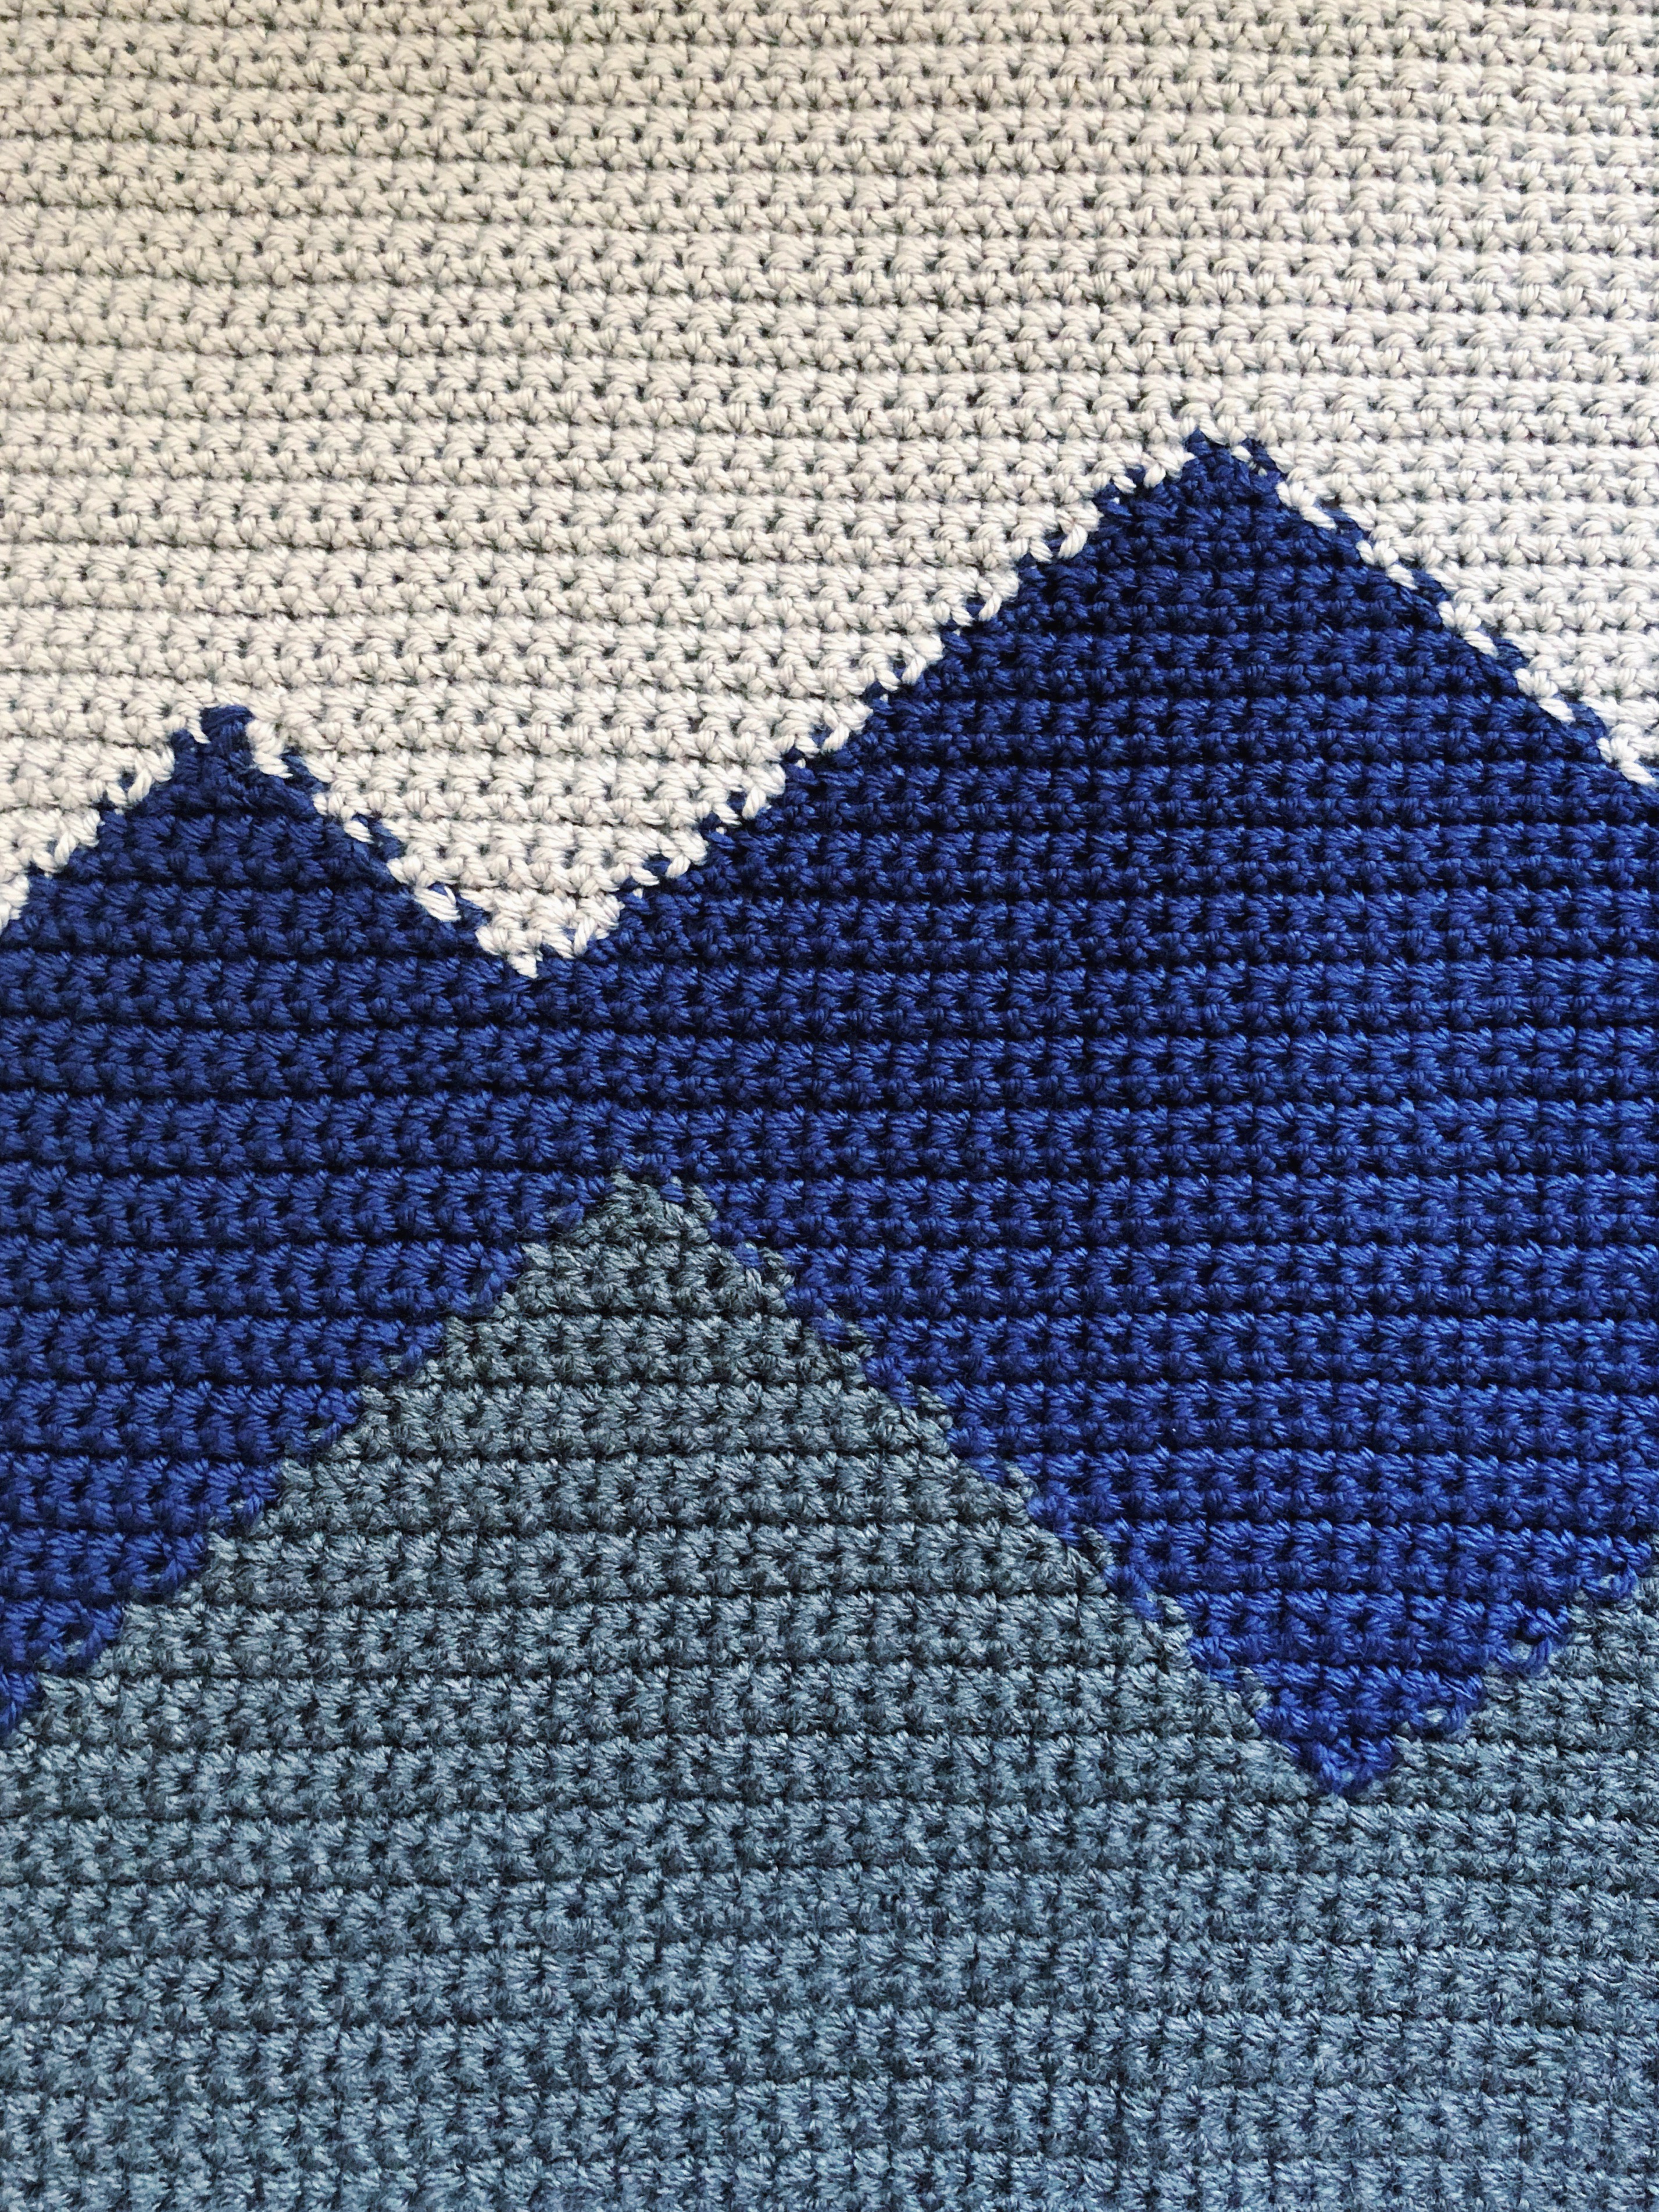
The blanket is worked entirely in single crochet and is 60 stitches across by 70 rows tall. The finished blanket came out to 36 inches by 32 inches using super bulky yarn and a size P hook.
The trickiest part of the blanket is knowing how to do the color changes correctly. Once you count your stitches and know where you’re supposed to be starting a new color you begin your single crochet in the stitch before the first stitch of the new color, and instead of finishing the single crochet with the first color you pull in the new color to finish it. Then you single crochet with the new color in the next stitch, which is your first stitch of the new color.

By increasing or decreasing one stitch of a color, depending on where you are in the pattern, your colors will move up and down diagonally and create the mountain slopes.

If you want to cut back on the number of ends you need to weave in, like I always try to do, you’ll be working with multiple balls of yarn at once, picking them up and dropping them as you move across the rows.
Stitch abbreviations:
- SC = single crochet
- CH = chain
Materials:
3 skeins each of-
Lion Brand Hometown USA Yarn – San Diego Navy.
Lion Brand Hometown USA Yarn Dallas Grey.
Lion Brand Yarn Hometown USA Yarn Springfield Silver.
Crochet Hook, Size P-15, 10mm.
Large-Eye Sewing Needle_________
Pattern:
Chain 61
Row 1: Using Color A (dark gray), SC in the 2nd stitch from the hook and continue across. 60 SC.
R2-10: CH 1 (does not count as SC), turn. SC across.
R11: CH 1, turn. SC across until there are two stitches from the end. Join Color B (navy blue) in SC 59 and do one SC of Color B in SC 60.
R12: CH 1, turn. SC with Color B in first stitch. Start the SC in the second stitch and pick up Color A yarn to finish. SC across with Color A.
R13: CH 1, turn. SC with Color A across until the 4th stitch from the end (SC 57). Pick up Color B and SC to end.
R14: CH 1, turn. SC with Color B for three stitches. Start 4th SC and join Color A. SC across with Color A for 18 stitches. Join a second skein of Color B for one SC. Don’t finish the SC of Color B, but add a second skein of Color A and SC across to the second to last stitch. Join the 3rd skein of Color B and SC the last stitch.
R15-23: CH 1, turn. Continue to SC with Colors A and B, increasing Color B and decreasing Color A one SC on each side of the mountain peaks with each row.
R24: CH 1, turn. SC across, dropping 2nd Color B skein and continuing with 1st skein until Color A change.
R25-31: CH 1, turn. Continue decreasing Color A.
R32-36: CH 1, turn. SC across with Color B.
R37: CH 1, turn. SC across with Color B for 15 stitches. Join with Color C (light gray) for one SC, join 2nd ball of Color B, SC across to SC 49, join 2nd skein of Color C, SC one and join 3rd skein of Color B. SC with Color B until second to last stitch, join 3rd skein of Color C, SC one.
R38-53: CH 1, turn. SC across, decreasing Color B by one on each side of the mountain peaks until they all reach their tops.
R54-70: CH 1, turn. SC across with Color C.
Note: Be sure to consult the stitch chart for help with color changes and row numbers!

I’ll be mailing the blanket this week, along with a onesie I found with little mountains on it (gotta love a theme!). I love how this blanket came out and I can’t wait to see pictures of it in the nursery and especially with her little boy!

This is an original pattern by Christina of February Sky Designs. Please do not claim this pattern as your own. If you wish to share this pattern, you may link to it but please do not reprint it on your site or sell it.
You may sell products made from this pattern but please clearly credit the design to me, Christina of February Sky Designs, and link to my blog februaryskydesigns.com. Thank you for respecting creators and their work!
***This post contains affiliate links. Thanks for your support!


The pattern and blanket are beautiful! Great job. I’m hoping to try it myself but, as a beginner I’m not sure how one might weave in the end as I go? Do I try to weave them into the new color as I pick it up?
Thank you!
Pam
Thanks Pam! There are a couple different things you can do with the ends, including working over the yarn tails, but you can also do what I did and just leave the ends until you’ve finished the blanket and weave them in last. Fortunately there aren’t tooooo many in this project 😆. Good luck!
How do i make this bigger? So instead of a baby blanket, a throw ( 52 x60)
Thanks
Hi Karin, I’m working on a throw size chart. I’ll let you know when I post it! -Christina
I absolutely LOVE your design and it is a perfect pattern for a friend’s new baby. I am wanting to use a worsted weight in place of the the super chunky, do you think it would work to do two sc per stitch in the pattern/square in the graph?
Thank you so much! I’d definitely do two stitches, or even three, per square with worsted yarn since my measurements are based on super chunky yarn. It might also be a good idea to add a few rows to the bottom and top of the blanket, depending on how it’s turning out. Good luck!
Pingback: Winter crafts – Hansey House Designs
I’m just seeing this now.
This blanket is AMAZING!!!!!
Love 🥰 love it!
Hi, I found this blanket and I love it. I making this as a baby gift for my daughter’s friends who have hiked the Appalachian Trail. Do you have a video tutorial about adding the new color? I’m just not getting it. Thank you.
Hi Michelle, that’s such a lovely gift idea! I don’t have a video, but I’ll try to explain- on the last stitch of a color, before you switch to the next color, you will yarn over and pull up a loop with Color 1, then instead of finishing the SC stitch with that color you’ll pull through with Color 2, finishing the last stitch of that section. Then you’ll SC with Color 2 until the last stitch of that section, and you’ll do half of the last SC with Color 2, finishing that stitch with Color 1 and continuing on. I hope that helps, and if you’re still fuzzy just look up “crochet color changes” on YouTube.
Thank you so much for responding quickly. I think I got it. Took a few tries, but I think it’s turning out well. 😀